
mysql高可用部署文档
配置mysql主从同步(一主两从)
(Master:192.168.117.129,Slave1:192.168.117.130,Slave2:192.168.117.131)
- 在master库创建授权账户(以192.168.117.130为例,131同理)
1
2
3
4
mysql -u root -p
Password: 输入密码
GRANT REPLICATION SLAVE ON *.* TO 'slave1'@'192.168.117.130' IDENTIFIED BY 'slave1';
GRANT REPLICATION SLAVE ON *.* TO 'slave2'@'192.168.117.131' IDENTIFIED BY 'slave2'; - 修改Master配置:
i) 编辑/etc/my.cnf配置文件ii)重启Master数据库1
2
3[mysqld] #在mysqld下面添加如下两行
log-bin = mysql-bin #slave会基于此log-bin来做replication
server-id = 129 #master的标示,唯一ID,一般采用IP最后一段iii)查看状态1
service mysql restart1
show master status;
- 修改Slave配置:(以192.168.117.130为例,131同理)
编辑/etc/my.cnf文件保存退出重新启动mysql服务1
2
3
4[mysqld]
log-bin=mysql-bin #slave会基于此log-bin来做replication
server-id=130 #master的标示,唯一ID,一般采用IP最后一段
slave-skip-errors=all #跳过所有错误分别进入两台机器的Slave mysql控制台,执行下述语句(以192.168.117.130为例,131同理)1
service mysql restart1
2
3
4
5
6
7
8mysql -uroot -p
stop slave;
change master to master_host='192.168.117.129',
master_user='root',
master_password='123456',
master_log_file='mysql-bin.000005',
master_log_pos=154;
start slave; - 分别查看从库状态:
1
show slave status\G1
2
3
4
5
6
7
8
9
10
11
12
13
14
15
16
17
18
19
20
21
22
23
24
25
26
27
28
29
30
31
32
33
34
35
36
37
38
39
40
41
42
43
44
45
46
47
48
49
50
51
52
53
54
55
56
57
58
59
60mysql> show slave status\G
*************************** 1. row ***************************
Slave_IO_State: Waiting for master to send event
Master_Host: 192.168.117.129
Master_User: root
Master_Port: 3306
Connect_Retry: 60
Master_Log_File: mysql-bin.000005
Read_Master_Log_Pos: 154
Relay_Log_File: localhost-relay-bin.000002
Relay_Log_Pos: 320
Relay_Master_Log_File: mysql-bin.000005
Slave_IO_Running: Yes
Slave_SQL_Running: Yes
Replicate_Do_DB:
Replicate_Ignore_DB:
Replicate_Do_Table:
Replicate_Ignore_Table:
Replicate_Wild_Do_Table:
Replicate_Wild_Ignore_Table:
Last_Errno: 0
Last_Error:
Skip_Counter: 0
Exec_Master_Log_Pos: 154
Relay_Log_Space: 531
Until_Condition: None
Until_Log_File:
Until_Log_Pos: 0
Master_SSL_Allowed: No
Master_SSL_CA_File:
Master_SSL_CA_Path:
Master_SSL_Cert:
Master_SSL_Cipher:
Master_SSL_Key:
Seconds_Behind_Master: 0
Master_SSL_Verify_Server_Cert: No
Last_IO_Errno: 0
Last_IO_Error:
Last_SQL_Errno: 0
Last_SQL_Error:
Replicate_Ignore_Server_Ids:
Master_Server_Id: 129
Master_UUID: 278b0fa2-a25b-11e9-8ccf-000c296bc078
Master_Info_File: /home/mysql/data/master.info
SQL_Delay: 0
SQL_Remaining_Delay: NULL
Slave_SQL_Running_State: Slave has read all relay log; waiting for more updates
Master_Retry_Count: 86400
Master_Bind:
Last_IO_Error_Timestamp:
Last_SQL_Error_Timestamp:
Master_SSL_Crl:
Master_SSL_Crlpath:
Retrieved_Gtid_Set:
Executed_Gtid_Set:
Auto_Position: 0
Replicate_Rewrite_DB:
Channel_Name:
Master_TLS_Version:
1 row in set (0.00 sec)
出现以下内容表示slave配置成功
Slave_IO_Running: Yes
Slave_SQL_Running: Yes
5)通过主库查看从库状态
1 | |

6) 测试主从同步(创建操作在master进行)
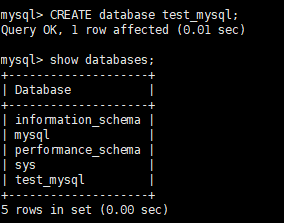
i)创建库(也可不创建,在原有的库上直接建表)
1 | |
查看已创建的库:
1 | |
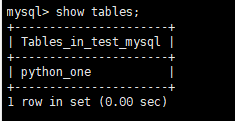
ii) 创建表
1 | |
iii) 查看已创建的表
1 | |
iv) 插入数据
1 | |
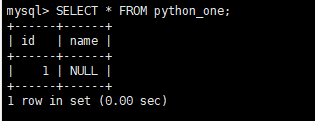
v) 查看数据
1 | |
vi) 分别在两个从库上面查看数据看是否同步成功
1 | |
MySQL运维(主从切换)
当MySQL主库问题时,需要进行主从切换。
1)将原有从库切换为主库
1 | |
在master库创建授权账户
1 | |
2)将原有主库切换为从库
1 | |
3)将原有从库切换为从库
1 | |

mysql密码的重置
1)关闭mysql
1 | |
2)修改mysql配置文件
1 | |
作用是登录mysql的时候跳过密码验证
3)启动mysql服务:
1 | |
4)修改密码
1 | |
- 重启mysql服务
先将之前加在配置文件里面的2句代码注释或删除掉,然后重启mysql服务,就可以使用刚刚设置的密码登录了。1
2
3
4
5[root@mytestlnx02 ~]# systemctl restart mysqld
[root@mytestlnx02 ~]#
[root@mytestlnx02 ~]# mysql -u root -p
Enter password:
Welcome to the MySQL monitor. Commands end with ; or \g.
磁盘挂载(待验证)
1)查看磁盘情况 fdisk -l
2)fdisk /dev/vdb # 对vdb硬盘进行分区
3)将硬盘格式化为xfs文件系统 mkfs -t xfs /dev/vdb1
4)mkfs -t xfs /dev/vdb1
5)mkdir 挂载点
6)mount /dev/vdb1 挂载点
7)执行以下命令,查看挂载结果。df -TH
8)设置启动时自动挂载磁盘 blkid /dev/vdb1 粘贴“/dev/vdb1”的UUID。
9)通过vim编辑 /etc/fstab
10)UUID=f5c5c392-4704-4475-9abc-f6a2e049f2ea 挂载目录 xfs defaults 0 0
参考文档 https://www.cnblogs.com/stulzq/p/7610100.html
All articles in this blog are licensed under CC BY-NC-SA 4.0 unless stating additionally.